The bent-over dumbbell row is a back-building pull that trains your lats, middle back, biceps, and trunk while each arm works independently. Use a stable hip hinge, pull toward your hips, and make every rep earn its place in your workout.
| Exercise Summary |
|---|
| Primary muscles |
Middle back |
| Secondary muscles |
Lats, biceps, and core |
| Equipment |
Dumbbells |
| Movement type |
Compound pull |
| Best use |
Back and upper-body training |
Bent-Over Dumbbell Row Form at a Glance
- Stand with your feet about hip-width apart and hold a dumbbell in each hand.
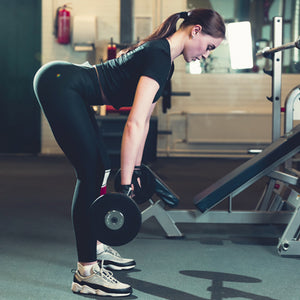
- Push your hips back until your torso is close to a 30-to-45-degree angle from the floor.
- Brace your abs, keep a long neutral spine, and let the dumbbells hang under your shoulders.
- Drive both elbows back and pull the dumbbells toward your hip pockets.
- Pause without shrugging, then lower the dumbbells under control.
What the Bent-Over Dumbbell Row Works
The bent-over dumbbell row starts with your back, not your arms. Your lats and middle-back muscles pull the upper arm behind your torso, while your biceps assist at the elbow. Your glutes, hamstrings, and abdominals work isometrically to keep the hinge position solid from the first rep to the last.
The independent dumbbells are the point. Each side must control its own path, so one stronger arm cannot quietly take over the set. Keep the dumbbells close to your body and pull toward the hip rather than straight toward your chest to give the lats and middle back more of the work.
How to Do a Bent-Over Dumbbell Row
-
Set your stance. Stand tall with the dumbbells at your sides. Use a hip-width stance with your weight balanced through the whole foot.
-
Create the hinge. Soften your knees and push your hips back. Stop when you can hold your torso steady without rounding your low back.
-
Brace before you pull. Tighten your abs as if preparing for a punch and keep your neck long. Look a few feet ahead on the floor instead of craning your head up.
-
Start from a dead hang. Let the dumbbells hang below your shoulders with a neutral grip. Your shoulders should be active, not hanging loose toward your ears.
-
Drive your elbows toward your hips. Pull both dumbbells back and slightly in. Think about moving your elbows instead of curling the weights.
-
Pause in the top position. Finish when your upper arms are just behind your torso. Squeeze your back without twisting or standing up.
-
Lower with control. Return the dumbbells to the hang over two to three seconds. Keep your torso angle fixed and begin the next rep without bouncing.
Five Mistakes That Kill Your Row
Turning the row into a shrug
If your shoulders climb toward your ears, your upper traps are taking over. Keep your shoulders away from your ears and pull your elbows back before increasing the load.
Standing up on every rep
A changing torso angle turns the movement into a momentum exercise. Choose a weight that lets you keep the same hinge from rep one through rep ten.
Pulling toward the chest
Pulling high often makes the elbows flare and reduces control. Aim the dumbbells toward the sides of your hips and keep your elbows close enough to feel your lats work.
Rounding the low back
A deeper hinge is not better if your lower back loses position. Raise your torso slightly, reduce the weight, and brace harder before you start the set.
Chasing weight instead of tension
Heavy rows only count when your back controls them. Use a full stretch, a short pause at the top, and a controlled lowering phase before adding another plate.
How to Program the Bent-Over Dumbbell Row
For muscle-building work, use 3 to 4 sets of 8 to 15 controlled reps after your main pressing or leg work. Start with a load that leaves 1 to 3 clean reps in reserve. When you can complete the top of the rep range without torso movement, increase the dumbbells at the next session.
For strength-focused upper-body training, use 3 to 5 sets of 6 to 10 reps and give yourself enough rest to keep every hinge position crisp. Pairing rows with pressing movements keeps your upper body training balanced; a dumbbell row also fits well after a barbell bench press session.
Bent-Over Dumbbell Row Variations
One-Arm Dumbbell Row
Use the one-arm dumbbell row when you want extra stability from a bench or need to focus on one side at a time. Keep the same elbow-to-hip path.
Chest-Supported Dumbbell Row
Lie chest-down on an incline bench when lower-back fatigue limits your rowing volume. This variation reduces the hinge demand so you can focus on the pull.
Bent-Over Barbell Row
The bent-over barbell row lets you use both hands on one load. It is a strong option when you can maintain a stable torso and want a heavier bilateral pull.
FAQ
Should you row both dumbbells at the same time?
Yes. Rowing both dumbbells together is efficient and makes it easier to keep your torso square. Use alternating reps only when you can stop your torso from rotating.
How far should you bend over?
Bend until you can feel your hips loaded while your spine stays neutral. Most lifters land between a 30- and 45-degree torso angle from the floor.
What grip should you use?
A neutral grip with palms facing each other is the best starting point. It gives your shoulders room to move naturally and keeps the pull simple.
Why do you feel dumbbell rows mostly in your biceps?
Your biceps assist every row, but they dominate when you curl the dumbbells rather than driving your elbows back. Lighten the weight and slow the lowering phase.
Are straps useful for dumbbell rows?
Straps can help when grip fatigue ends your set before your back does. Build grip strength separately and use straps only when they help your target muscles get productive work.
Can you do dumbbell rows on back-to-back days?
Most lifters recover better with at least one day between hard rowing sessions. Keep the second exposure lighter or use a supported variation if your lower back is still fatigued.
Bottom Line
The best bent-over dumbbell row is not the heaviest one in the gym. It is the rep you can hold in a stable hinge, pull toward your hips, pause with control, and lower without your shoulders taking over. Build that rep first, then load it.
Related Exercises




Leave a comment